
Welcome to my step by step guide for operating embroidery machines. They are fantastic tool for adding beautiful designs and intricate details to your fabric. Whether you’re a beginner or an experienced crafter, learning how to operate an embroidery machine professionally can unlock great creativity. It’s a skill where you must learn how to operate a technical machine. There is a methods for every step and in the end, you receive your reward in the form of a lovely, embroidered design that you can wear or even sell. You will also need to master some additional information about needlework, hoops and other fields associated with it. Here is a detailed article to guide you.
We’ll go over all the important steps of operating an embroidery machine in this blog post. Everything will be covered, including how it operates, what basic supplies you’ll need, and some fantastic projects to get you started. Curious? Continue reading!
However, before we move too far, you should be aware that the focus of this article is on home embroidery machines, not multi-needle embroidery machines, which are a little more complicated and are not typically used by beginners to learn the art of machine embroidery.
Selecting the best suitable Embroidery Machine
Let’s be honest. Mostly people get confused on this very first step. It’s simpler to operate some embroidery machines than others, all of them are different yet similar. Therefore, if you want your learning curve to be less steep, choose one that is known for being simple to understand. The top single needle home embroidery machines for beginners and novices are listed here. (a link will go here)
Choosing the correct machine should be your first priority. It’s true that you can make eye-catching embroidered pieces with a regular sewing machine, you don’t even need a special embroidery machine.
Pricing:
The price of an embroidery machine varies from $500 to $10,000. Cheaper models limit the size but not the quality of the stitches. For 4×4 designs, a cheap machine with common accessories might work just fine. More steps are needed to create larger layouts, but a more expensive model makes easier creation. Larger designs are possible because the machine can accommodate larger hoops as its price goes up.
Also, embroidery machine can draw original embroidery designs on nearly any fabric by using a process known as free motion.
Parts And Accessories That You Need:
Parts And Accessories That You Need:
Besides your embroidery machine, you’ll also need:
- Fabric
- Hoops
- Embroidery stabilizer
- Machine embroidery thread holder and thread
- Bobbin
- Embroidery needle
- Machine embroidery patterns
- USB connector
The fabric:
The fabric:
To do the starting machine embroidery projects you don’t have to use fancy fabric. Any fabric of your choice will do, Even left over cotton. Although keep in mind that any material that is too light for experimentation should be avoided as it could pucker and frustrate you.
The hoop for embroidery:
The hoop for embroidery:
Your fabric is held in place while you stitch by the embroidery hoop. Onto the machine, the hoop clips. Although the style of clip varies from machine to machine, you can usually feel when the hoop is securely locked into place. It’s not required to clip the hoop onto the machine when you’re setting it up. Before attaching the hoop, you should hoop your fabric and stabilizer.
The maintainer or stabilizer:
The maintainer or stabilizer:
When starting out, experts recommend using a medium weight cut away stabilizer when embroidering on thin cotton. To keep your main piece of material from puckering and to give the stitches something to grab onto, place a thin piece of fabric underneath it.
The holder of threads:
The holder of threads:
You can place your embroidery thread on the thread holder, which is typically a small arm that swings out from the top of your machine. You can begin threading the embroidery machine after you set your embroidery thread on this peg.
The needles:
The needles:
It’s very unlikely that a needle will be installed when you first unpack and set up your machine. It should be fairly obvious where the needle is. Usually, a knob must be unscrewed in order to insert a needle and then the knob must be tightened to secure the needle. It’s important that you use needles designed for embroidery machines rather than sewing needles for your machine. Because embroidery needles have a bigger eye, thread can pass through them more easily. Check out the guide I have created to under the embroidery needles.
The bobbin case and the bobbin:
The bobbin case and the bobbin:
The bobbin is like a tiny thread spool. To create back stitches, this second thread is inserted into your fabric through bobbin. Without both a top and bobbin thread, your embroidery machine would not be able to make stitches.
Beneath your primary needle housing is a bobbing case in installed that secures the bobbin in place. There are embroidery machines with and without detachable bobbin cases. Remember that it matters which way the bobbin thread is oriented. To determine whether the bobbin should unwind in a clockwise or counterclockwise direction before placing it inside the bobbin case, consult your machines handbook.
To wind the bobbin thread, you can use a bobbin winder or your embroidery machine. Use embroidery bobbin thread, which is thinner than regular embroidery thread, if you are winding the bobbins by hand. Additionally, pre-wound bobbins made specifically to fit your embroidery machine are available for purchase.
Coming up with the embroidery design or letters
Making an embroidery design is the first decision you must make. Choose from a pre-installed design or use your machine’s screen to type out a word or name. Since you would only need to use one thread color, a word or name is the easiest option. The name is ready to be stitched once it has been typed.
USB connector
Your embroidery machine has a USB port that lets you load designs directly from your computer onto the device. Don’t worry about that just now if you’re just getting started. You can get some practice sewing the machine’s built-in designs. When you’re ready to use your embroidery machine, you’ll transfer some third-party designs from your computer.
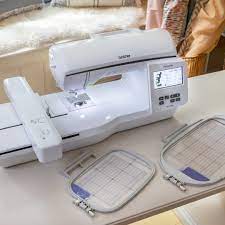
Step 1: Get to know your machine
When you open the box, the embroidery machine's main body will be the largest piece of equipment. Organize that first. The machine needs to have a few more parts added to it before you can use it.
Take some time to read the instruction manual and familiarize yourself with the features, buttons, and settings of your embroidery machine. Understanding these basics will make the setup and operation much easier. Before diving into embroidery, it's essential to get to know your machine. Start by reading the instruction manual thoroughly. It will provide valuable information on the machine's features, buttons, and settings. Understanding these basics will make the setup and operation much easier.
Step 2: Set up the machine
After becoming familiar with your embroidery machine, you are now ready to set it up and make everything live. Proper setup is essential for achieving clean and precise embroidery. Now make sure to thread the needle and bobbin according to the instructions in the manual. This includes threading the needle and bobbin. Follow the instructions carefully in the manual to ensure everything, especially thread is in place correctly.
Parts should be adjusted and secured in the machine first if it’s a dual functioning machine:
When switching between functions on a sewing and embroidery machine, there are a few adjustments to be made. Make sure the machine is unplugged from the circuit and turned off before you start. First, replace the presser foot with a freehand embroidery foot. Alternatively, you can simply fasten this foot, lowering the feed dogs, and embroider freehand with your hands. You’ll need an embroidery frame (available in different sizes) in order to use computerized embroidery. You’ll need a larger frame the larger your embroidery design is. It could also be necessary to replace the arm.
Step 3: Choose your design
Now comes the fun part – choosing the design you want to embroider! You have two options: create your own design or use pre-existing designs available online or in embroidery software. If you're a beginner, it's recommended to start with simpler designs and gradually work your way up to more complex ones.
Digitizing:
Digitizing is an essential part to work with machine embroidery. It is like turning your ideas in the readable format for your machine to follow. Through digitization, we instruct the machine on where to stitch the digital pattern.
There are many service providers out there who can digitize any pattern or design that you want your machine to stitch out.
Step 4: Prepare the fabric
Hoop the fabric tightly, ensure that it is smooth and wrinkle-free, iron it if required. This step helps maintain the stability of the fabric during the embroidery process, resulting in clean stitching. Preparing the fabric is essential for achieving high-quality embroidery.
Quick simple steps for working with a home embroidery machine:
How to set up embroidery fabric and thread:
Firstly, you need to set up your fabric in the embroidery frame before you can put it into the machine. In addition, you might need to use a stabilizer if your fabric is thin.
How to use a stabilizer with fabric:
Many factors come with using a stabilizer, as there are many types and different uses for them. They are used for both, as backing and topping. Place your fabric and stabilizer (if using any) over the lower frame. It can be a used-up garment, a piece of fabric that will be used as a pocket or patch, or a pattern piece that has already been cut out.
How to Hoop the fabric:
To lock or click the top frame into place, place it over the cloth and press. Next, tighten the frame and double-check that it is secure by turning the dial or knob. To make it nice and tight, you might need to use a screwdriver. Furthermore, pull up on the fabric’s sides to ensure.
How to secure and lock the frame into place:
Flip up the latch, slide it into the embroidery arm, and click it back down. Look again that your bobbin is fully loaded, and that no additional fabric is tucked under the frame.
How to thread the machine:
To begin with, do not miss your machine’s manual. That will help you to determine the precise threading path of the machine you are using. Though there are basic steps you need to take. Insert your thread through the machine, make sure to follow the right direction then lift the presser foot first in order to release the tension discs. Next, use the automatic needle threaded or a steady hand to thread the needle from front to back. This procedure might take some time and practice. And do not forget to complement the color of the bobbin thread to that of the fabric or the main or feature embroidery thread.
Step 5: Load the design
Connect your embroidery machine to a computer or use a USB drive to transfer the design. Follow the instructions in the manual to load the design successfully. To start embroidering, you'll need to load the design onto your machine. The majority of embroidery machines let you experiment with changing the design's size and placement within the frame. To see a preview of your design, you can also choose the colors based on the threads you have.
Step 6: Adjust settings
Depending on the fabric and design, you may need to adjust settings like stitch density, thread tension, and stitch length. Take your time to experiment and find the favorable settings for your specific project. Depending on the fabric and design, you may need to adjust various settings on your machine. These settings include stitch density, thread tension, and stitch length.
Step 7: Start embroidering: putting embroidery on cloth
Once everything is set up and the design is loaded, press the start button and watch as your machine brings your design to life. Once everything is set up and the design is loaded, it's time to start embroidering! Press the start button and watch as your machine brings your design to life.
Pay attention to which color goes first in the lineup. When every color of thread is finished, the machine will stop, and an embroidery sequence will appear on the screen. Just raise the presser foot, select a different color for the thread, and press start again until all the colors are used! After stitching is finished, release the latch to remove the embroidery frame.
Step 8: Finishing touches
Once the embroidery is complete, carefully remove the fabric from the hoop and trim any loose threads with the help of scissors or clipper. You can also add additional embellishments like beads or sequins if desired. All of the loose threads should be clipped to give the embellishment a professional look.
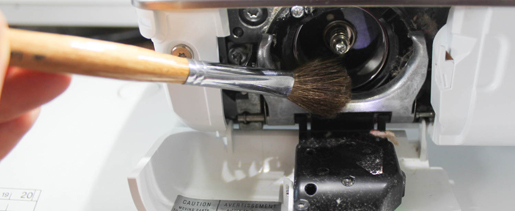
Step 9: Cleaning and taking care of machine
After finishing the work, give your machine a clean-up. Remove bits of thread and dust. Check the tension in the bobbin thread. Completing this step will help you start your next project as easily as the first one, as your machine will work well the next time too. Check out my guide how to maintain your embroidery machine.
Conclusion:
Using a step-by-step guide can be a game changer for both beginners and expert crafters. By following a proper guide, you will have clear instructions and valuable tips and techniques at your fingertips. This is a great way to start with your embroidery machine projects. Grab your machine thread and fabric and get started.

Edible Easter Slime
Mauris congue venenatis nisl ut varius. In posuere sem lorem, eu iaculis ante. Quisque eget turpis
Creative Back To School Ideas
Mauris congue venenatis nisl ut varius. In posuere sem lorem, eu iaculis ante. Quisque eget turpis
Exclusive Content
Be Part of Our Exclusive Community
Sed finibus, sem elementum tincidunt tempor, ipsum nisi ullamcorper magna, vel dignissim eros sapien at sem. Aliquam interdum, ante eget sagittis fermentum, mauris metus luctus sem, at molestie.


Leave A Comment